
Here’s a detailed breakdown of the workflow for the newest version of KinectToPin’s After Effects plugin. The new panel is designed to flow top-to-bottom: start at the top (choosing either 2D or 3D), then work your way down step-by-step.
- Install the the KinectToPin UI Panel by copying it and the accompanying .ffx file into your After Effects “ScriptUI Panels” folder. Restart After Effects, then open the panel by going to Window > KinectToPin. It should look like this:
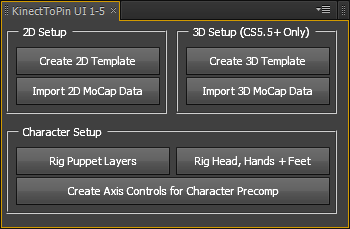
- Click “Create [2D/3D] Template.”
- Open the template comp. To import your tracking data, you have two options:
- Import your motion track directly via the “Import [2D/3D] MoCap Data” button. This method is good for short tracks, but VERY slow for longer ones, and may crash if you’ve recorded more than about a minute.
- Alternatively, export your data from KinectToPin’s capture app by clicking the “Save” button. Open the resulting text file (which can be found in KinectToPin’s “data” folder — 2D AE points are in “saveae-points” and 3D are in “saveae-points3D”), copy its entire contents, select all the point controls on the template “mocap” layer (press U to show them) and hit paste.
- If you’re using the 3D template and have a character who isn’t facing forward, reposition the control points by manipulating the “mocap” layer’s rotation and scale parameters.
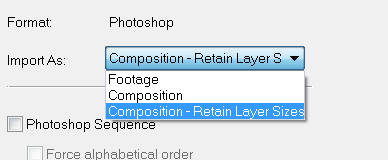
- Import or create your character’s layers: it’s usually best to import as a composition and choose “retain layer sizes.”
- Add the character layers to your rigging template. If the character is vector based (Illustrator or AE shape layers), you’ll need to precompose each layer individually before you add Puppet pins.
- Add puppet pins to all the layers that will be controlled by two or more mocap points, and name them to match the skeleton’s joints.
- Select the layer you want to rig.
- Switch to the Puppet Tool, and create pins where you want the joints to be positioned.
- Press U to show the pin names in the timeline, then select them and hit enter to rename them to refer to the correct joint. If you need to look up what to call them, refer to the red control layers — the names should all match. Repeat for each layer.
- Click “Rig Puppet Layers” to snap the layers to the skeleton.
- Select your rigged layers, hit S to show the scale parameter, then scale them all to fit.
- To rig the non-puppeted layers — the head, hands, and feet (AKA the layers with only one control point each)– all you need to do is rename their layers. They should match the control points they’re linking to, but with the addition of “_layer” at the end. So: head_layer, r_foot_layer, l_foot_layer, r_hand_layer, l_hand_layer.
- Click “Rig Head, Hands + Feet“, then scale them to fit. You may also need to adjust their anchor points (select each layer and press A).
- Something not lining up right? Adjust the position/scale/rotation of the “mocap” layer to shift the entire character, or move the red control nulls to tweak individual body parts. If it seems like a puppet pin is in the wrong place on a layer, delete it, add and label a new pin in its place and press the “Rig Puppet Layers” button again. You may also want to change the number of triangles on a given puppet mesh — too few and deformation isn’t detailed enough, too many and After Effects will get VERY SLOW.
- Once your character is ready to composite, drop its template comp into a new comp. If you plan to go close up and only need to do a 2D composite, enable Collapse Transformations. This will get back a lot of the image detail you lost in scaling down your layers to fit the puppet model. If you want to composite in 3D and need your Z-motion back, click “Create Axis Controls for Character Precomp.” Leaving everything unchecked will give you full motion in all three axes. Checking any (or all) of the boxes will lock your character in place in the selected dimension(s).


23 comments
john says:
Apr 21, 2013
wow I am going to do this with my kids at school, this is so so so so amazing, thank you!
Victoria says:
Apr 21, 2013
Let us know how it goes! If you’re using it with a group, I highly recommend getting an inexpensive presentation remote to control K2P (I use this one) — it makes things a lot easier. Also, if you’re planning to record a whole bunch of tracks at once, you might want to export them in batches. I find it gets a bit slow-to-crashy after about 10 or 15 of them…
Cheezie says:
May 27, 2013
I’m really enjoying this blog. Haven’t got a kinect but will get one. Can I ask what versions of After Effects does this work with? Currently I’m using CS5 on a mac.
Victoria says:
May 27, 2013
Works with CS4+ in 2D mode, CS5.5+ in 2.5/3D mode, both on OSX and Windows. Hardware-wise, KinectToPin works with both the Xbox Kinect (with AC adapter) and the Kinect for Windows, as well as the Asus Xtion.
CHEEZIE says:
May 27, 2013
Great. Thanks!
Bryan says:
Jun 5, 2013
Hey there,
this is a non Kinect to pin question but I thought id ask anyway.
My Trackingdata is very good in it X and Z Values, but often glitching in Y.
Im trying to select those shaking Y Keyframes and set them to the same 1 Y-Value, to keep them from jumping. Everytime I do this after effects will also freeze the X and Z Values to the new the fixed Values even though I only selected the Y value.
Is there a way to only change Keyframes from the trackingData in only one dimension, freeze them in one dimension?
separating Dimension does not seem to work for 3D Points.
Any ideas on this would be great, it would make my life easier. Thanks for this great plugin!
Victoria says:
Jun 5, 2013
What kind of tracking data is it?
Bryan says:
Jun 12, 2013
Hey,
its the Kinecttopin Mocap layer’s Data I have imported.
Basically any of the L
For some Keyframes im trying to set fixed Y Value, but everytime I set it it simply create a Static keyframe for all axis on all key frame ive selected.
Victoria says:
Jun 12, 2013
Ah, yeah, you can’t separate dimensions like you can with position keyframes. If it’s just noisy data on one or two points, you might want to mess with the smoothing values or simply delete the points entirely and let AE interpolate. If it’s the whole character jumping around, drop your character rig into a new comp, click the “Create Axis Controls” button and lock the Y-vals so they don’t move at all.
Victoria says:
Jun 12, 2013
Oh! You could also convert the expressions on the control nulls to position keyframes, and separate dimensions there! Generally it’s best to not edit your mocap data directly when you can avoid it…
Jeremy says:
Aug 15, 2013
Hello – what a great setup! Just did my first capture and rigging. Just wondering, what does the ‘3D’ offer? could you please go into more detail on how to use the ‘3D’? I don’t quite understand the idea behind the ‘axis controls’ and what they achieve.
For example within a 3D template comp, I threw in a camera to try and see if the skeleton/limbs were moving in 3D, and although the way a camera works with the mocap information is a bit wierd [why is that?], I could see that the full 3D skeleton information is there. But once I put the template comp into another, even after collapsing and creating the axis controls, I can’t orbit around or twist my capture in 3D space.
Have I missed something here? Is there is a way to harness all the 3D information I can find within the template comp? Or a way to use a camera within the template comp that is crazy backwards?
Thanks
Victoria says:
Aug 15, 2013
The ‘3D’ template is more like 2.5D due to the limitations of 2D character parts + the Kinect’s recording abilities. If you want the character to move in 3D, your best bet is actually to animate the “mocap” layer in 3D, nest the character comp in a new comp and add the axis controls (leaving Z unchecked). You can also use the camera in the character comp if you want to move around the model, but it’s a lot less intuitive. The weirdness of the camera has to do with the fact that the character part layers are faux 3D — their position and scaling is relative to 3D points, but they’re not themselves 3D layers. This is because the Puppet Tool is itself limited to 2D deformations.
Arti G says:
Sep 18, 2013
Why xml importing takes so long (~15 min.)? Is it possible to speed up? I saw ‘save’ button which should generete txt file in saveae folder, but it doesn’t work (no folder, no file).
Victoria says:
Sep 18, 2013
It’s super slow in AE because Javascript/Extendscript doesn’t enable the same type of fast conversion that we can do in the capture app.
Did you keep the app’s folder structure intact? If you installed it by copying it somewhere else it won’t know where anything goes so it can’t export correctly. Also, check your settings.txt file and make sure K2P is set to export the format you need.
Adam says:
Nov 5, 2013
When I click save it doesn’t save me a .txt. I haven’t moved the folder structure at all, just extracted and ran from there. How do i get it to export me a .txt instead of the slow to import .xml?
Victoria says:
Nov 5, 2013
Check settings.txt and make sure the type of files you want to export is set to “true”.
matt chapman says:
Jan 17, 2014
Can you speak a little bit to the rigging aspect? I don’t do my drawings in Photoshop, do I have to convert them into photoshop docs to do the rigging?
Irght now I have a shoulder, neck, torso, elbow, hand, right hip, left hip, etc, but they are all .PNGs with an alpha channel.
What size should the PNG be or does it have to be in photoshop? I am not so handy with Photoshop so it would be super cool if I could do character design in anything else and then import.
Do the names have to match exactly?
Many thanks!
Victoria says:
Jan 17, 2014
You can call your layers whatever you want (and have as many or as few as you want), aside from the head, hands and feet. PNGs should be fine — certainly doesn’t need to be Photoshop, can even be vectors or AE-native shape layers(although scaling gets a little weird with them at times). Work big (big enough that the closest zoom you plan to do on your character is full res), drop in the puppet pins, then scale the layer down to fit the tracking data. That way, when you composite the character precomp into a scene, you can enable Collapse Transformations and scale back up.
matt chapman says:
Jan 17, 2014
argh…. i’m very close! I have 75% of the puppet in, but the left leg is not working. I have rigged it several times and checked that the pin names are the same as the layer names.
any advice? I have deleted the layer, imported it again, precomposed it and then put two new pins in.
The first time i rigged the puppet character I got a bad argument when I ran the script. Also nothing happens when I press rig heads, hand and feet, even though I have named the layers Head, l_hand, r_hand.
I saved the project when i first tried it without any body parts in, maybe I will just start from scratch again, unless you know a way to manually attach pins to joints?
thanks! I’m prettttty close! 🙂
Victoria says:
Jan 17, 2014
You’ll get the argument error when you have a puppet pin with a name that doesn’t match one of the data points. Not sure why one leg’s working and the other isn’t, that’s very odd… Take a look at your mocap data layer, see if one of the sources is missing or has been renamed somehow.
And check step 10 above for the correct head/hands/feet layer names. For those you have to add _layer to the end.
Dana Burman says:
Mar 12, 2015
Hi, I have things mostly working, however the .txt files that KinectToPin saves does not save the tracking data for the head (and in the 3D track the head and neck).
More specifically, the files in saveae-points don’t have any keyframe data in “Effects Point Control #1” and the ones in saveae-points3D don’t have any keyframe data in “Effects Point Control #1” or “Effects Point Control #2”. The tracking data is in the XML, but that’s a slower process to import.
Is there a way to get this working since the .txt method is so much quicker? Thanks.
Victoria says:
Mar 12, 2015
This is a known issue. Open the settings.txt file, find “Delay Between Saving Files” and crank that up to something like 1000, then relaunch K2P and hit save again.
M.ghandchi says:
Oct 2, 2017
Hi . How can use kinecttopin with kinect v2 device .